Nov 11, 2014 5:22 PM Originally posted to my forum on April 3, 2007: The original set came from many notes on Doily of the Month group where I was one of the admin/mods, and internet searches, and my own crochet forum where we did it as a cal. For days & nights, I sorted thru many notes, searching for any mention of the BMC, and put the original list together and in one
place, and put them on my forum, where later, they were added to by my own
forum members when we had the cal. I will say it hurt to spend so long creating and gathering the notes, then see everyone being sent to someone else's forum to see them, where they were copied without permission. Now I see where they are a pdf with someone else's name on the bottom. I think of Crobee who suffered from rheumatoid arthritis and still loved her crochet and painstakingly wrote down notes for us - and now I see someone else presenting them with her 'I did this or that' sounding like they were the one who suffered thru the details. Rest in peace Crobee. Please don't copy and paste them somewhere else, but send them to my forum or here. I am going to put them here also, because people who don't have paid memberships have trouble accessing messages older than 3 months on the forums. This is where they are on the forum, where we had a cal on the BMC: http://forums.delphiforums.com/crochetplus/messages?msg=666.1Here are the notes here, incase that fails to open: 30" diameter - I'm guessing the name for
this doily comes from it being so large it covers most tables, so it is
only on the table BETWEEN MEALS, and taken off for actual eating! I'm
thinking my table is actually something like 26-28"!!!
3 balls of 350 yd size 10 thread, and I've heard some people needed a 4th ball!
Steel hook, size 6
You may have it in a magazine already, such as:
Old time Crochet Magazine from 1997, Vol 19, No 19, Pg 23-27.
If not, it's online at: http://www.antiquepatternlibrary.org/pub/PDF/Corticelli5-1of2.pdf
NOTES I'VE SAVED OVER TIME FROM OTHERS, incase I got brave and made it one day:
1. In round 39 a dc group consists of 13 dc, and yes the pattern is correct in telling you to slip stitch in the first 6 dc.
*Crobee has her notes on rnds 38 & 39 here: 666.47
2. You will have 82sc and 82 ch-8 loops on round 39.
3. On rnd 44 I had 82 ch8's
. Q: round
45. The pattern says to dc in each ch and sc around. I’m afraid I know
the answer to this question, but I’ll ask anyway. Do I really dc in each
chain or is it 8 dc in the 8-ch loop? I think I may need to go back and
redo Round 44 to make the chains looser and easier to crochet into.
A: yes you really dc in each chain. On round 45 after doing a dc in each ch and sc I had 738 dc, 185 V-stitches.
5. Rnd 46 I have 145 V stitches, Also make sure you start right by dc in base of the first ch-5.
DBL TRBL CROCHET ILLUSTRATION:
http://www.anniesattic.com/crochet/content.html?content_id=6
NOTES ENTERED ON JAN 27, 2008:
Notes: Beginning chain is counted in with the stitches as a
> stitch. Ex: ch-3 at beginning is counted as dc.
>
> Rnd 1: 36 dtr including beginning chain
> Rnd 2: 18 ch-4 loops and 18 sc
> Rnd 3: 18 ch-5 loops and 18 sc
> Rnd 4: 18 ch-5 loops and 18 sc
> Rnd 5: 99 tr
> Rnd 6: 99 sc and 9 ch-3 loops w/sc between (9 pattern repeats)
> Rnd 7: 81 sc and 18 ch-3 loops w/sc between
> Rnd 8: 63 sc and 27 ch-3 loops w/sc between
> Rnd 9: 45 sc and 36 ch-3 loops w/sc between
> Rnd 10: 27 sc and 45 ch-3 loops w/sc between
> Rnd 11: 9 sc and 54 ch-3 loops w/sc between
> Rnd 12: 54 ch-3 loops w/sc between
> Rnd 13: 54 ch-3 loops w/sc between
> Rnd 14: 3 dc in each loop x 54 loops = 162 dc
> Rnd 15: 164 sc
> Rnd 16: 82 ch-2 sps and 82 dc
> Rnd 17: 41 v-st with 41 ch-3 between
> Rnd 18: 41 v-st with work between
> Rnd 19: 41 v-st with work between
> Rnd 20: 41 v-st with work between
> Rnd 21: 41 v-st with work between
> Rnd 22: 41 v-st with work between
> Rnd 23: 41 v-st with work between
> Rnd 24: 41 v-st with work between
> Rnd 25: 41 v-st with work between
> Rnd 26: 41 v-st with work between
> Rnd 27: 41 v-st with work between
> Rnd 28: 328 dc
Rnd 29: 246 dc and 41 ch-2 spaces (41 repeats)
Rnd 30: 246 dc and 82 ch-2 spaces (41 repeats)
Rnd 31: 246 dc and 123 ch-2 spaces (41 repeats)
Rnd 32: 246 dc and 164 ch-2 spaces (41 repeats)
Rnd 33: 287 dc and 164 ch-2 spaces (41 repeats)
Rnd 34: 328 dc and 164 ch-2 spaces (41 repeats)
Rnd 35: 369 dc and 123 ch-2 spaces (41 repeats)
Rnd 36: 410 dc and 82 ch-2 spaces (41 repeats)
Rnd 37: 451 dc and 41 ch-2 spaces (41 repeats)
Rnd 38: 533 dc
Rnd 39: 82 ch-8 loops with sc between
------------------------
CROBEE'S ADDITIONAL NOTES ON RNDS 38 & 39:
Rnd 38: "Ch 3, dc in ea dc and ch around. (I think she meant to say; dc in ea dc and ch sp around. But I could be wrong!
What I did was a little different. I did dc in ea dc but instead of
dc in ea ch, I just did one dc in the ch space ( the ch space is made up
of a ch 2 from the previous round) If you do a dc in each of the two
chains it doesn't work out right for rnd 39.
Rnd 39: sl in next 6 dc's, ch 1, sc in same place. *ch 8, sc in center dc of dc group, ch 8, sc between dc groups.
The groups of dc's are made up of 11 dc's, so I did a sc in the
center dc which would be the 6th dc, then for the 'sc between dc groups'
I did a sc in the one dc I had done in the chain space of Rnd. 38
---------------
Rnd 40: 82 ch-9 loops with sc between
Rnd 41: 82 shells with ch-3 loops between
Rnd 42: 82 v-st with work between
Rnd 43: 82 shells with work between
Rnd 44: 82 ch-8 loops with sc between
Rnd 45: 738 dc
Rnd 46: 184 v-st This is the round that I had to "fudge"
on. You have repeats of "v-st, skip 3 dc" which will be worked over
4 stitches. But 738 is not evenly divisible by 4 and you need to
come out with 184 v-st to make the rest of the pattern line up
correctly. So I skipped an extra dc between 2 of the v-st repeats;
one close to the beginning of the row and one a little past the middle.
Rnd 47: 184 v-st
Rnd 48: 92 loops
Rnd 49: 92 loops
Rnd 50: 92 repeats: 276 sc and 92 ch-4 loops
Rnd 51: 644 dc (7 time 92 repeats)
Rnd 52: 23 repeats (each repeat worked over 28 sts. from last row)
Rnd 53: 23 repeats (13 sc and 2 shells per repeat)
Rnd 54: 23 repeats (11 sc and 2 larger shells per repeat)
Rnd 55: 23 repeats (9 sc and 16 dc per repeat)
Rnd. 56: 23 repeats (7 sc, 16 dc, and 1 v-st per repeat)
Rnd 57: 23 repeats (5 sc, 18 dc, and 1 v-st per repeat)
Rnd 58: 23 repeats (3 sc, 20 dc with ch betw per repeat)
Rnd 59: 23 repeats (1 sc, 12 dc with ch betw per repeat)
------------------------------------------------------
MARY'S NOTES:
My suggestions on the pattern.
Do not even debate changing the directions from the way the pattern is
written on round 45 and round 51...just change it -put the dcs in the
loop.
Round 39: I didn't
have to sl stitch 6...I just started out with ch 1, sgl cr in the same
place and *ch 8..... etc.,( I know elsewhere on the notes it says to do
the slip stitches....????) just do what you need to do to get the ch
8's around
Round 45: easier way and does not change the look of the doily since the stitches above hold the stitches in place:
Ch 3, 8 dc in each chain loop 8 below and dc in each sgl cr around, join with a sl st to the top of beg ch-3.
Round 51: easier way and does not change the look of the doily since the stitches above hold the stitches in place.
Ch 3, 4 dbl cr in each ch 4 loop and dc in each sc around, join with sl st in top of ch-3
Also: when crocheting on a
large project, don't count your progress by rounds since as you get out
farther, it takes time to get around the piece. Instead, measure your
progress by the use of thread and watch the ball get smaller.
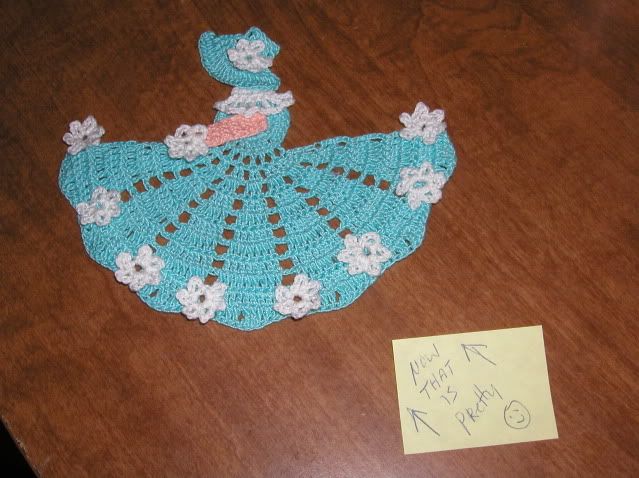
Nov 10, 2014 2:01 AM I had originally finished the body, maybe a couple of years ago. Then as I read what to do next, I realized it called for 2 bodies, sewn together. I didn't want to do that, as it would make it hard to get dry. Oddly, I just put it up and stopped on it. I took it out tonight and wondered why I just didn't finish it as one layer, the way I wanted it. So, I only had to put the beak and combs on and it was done. Ready for hubby to use as a hot pad on his tv tray! Body is made from dish cloth cotton, but beak & combs from Redheart, so they wouldn't fade. 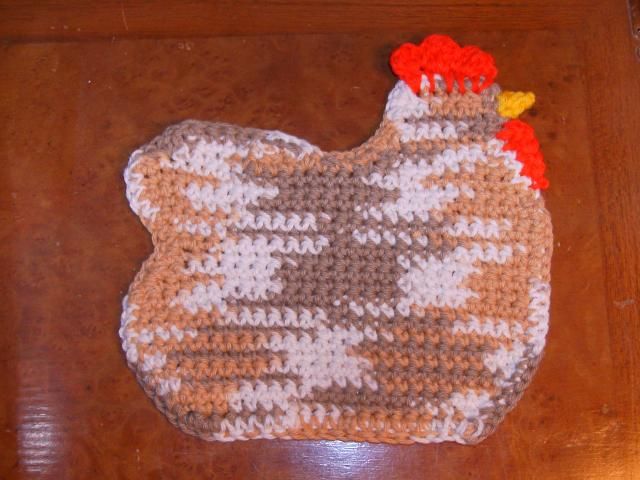 Pattern from: Annie's Attic #873151, Ultimate Book of Pot Holders Nov 4, 2014 10:02 AM 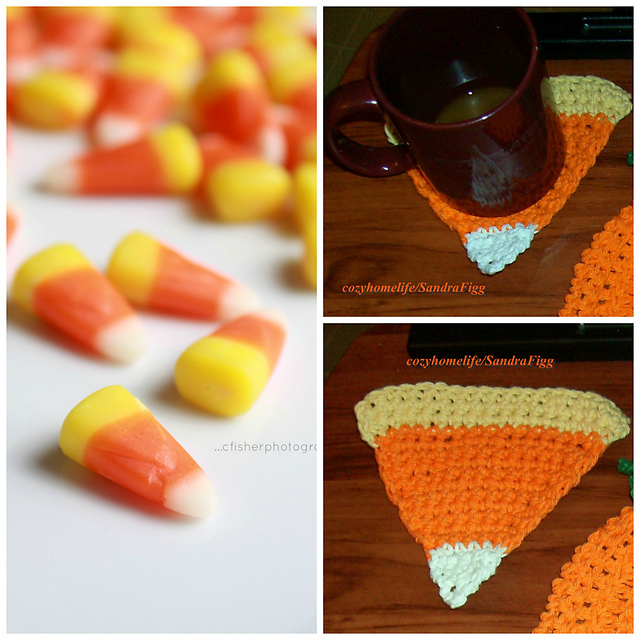 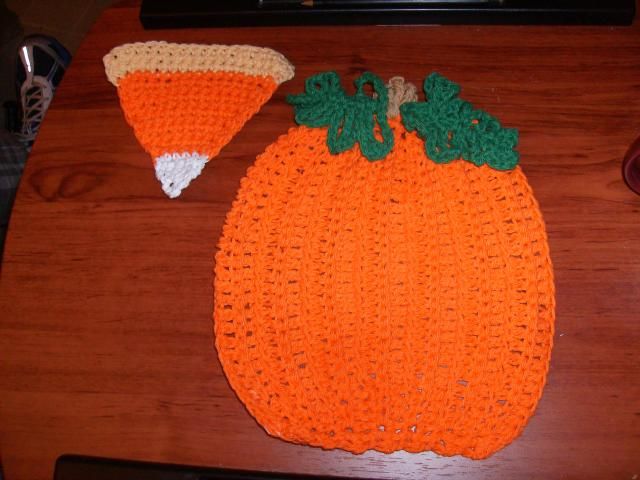 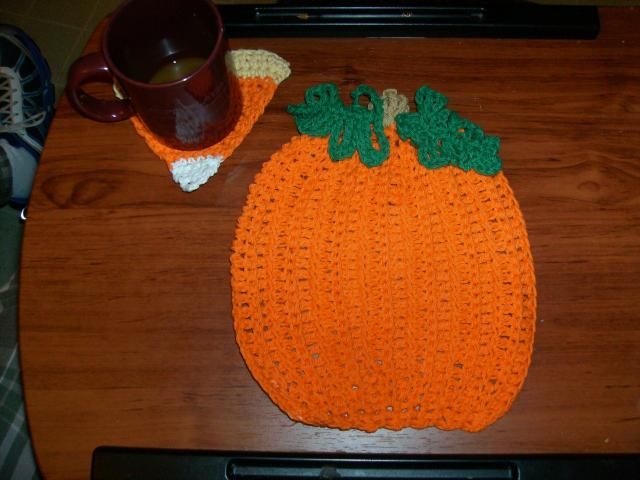 I
made the pumpkin from a free pattern on http://www.crochetmemories.com/blog/pumpkin-patch-decorative-potholder/#more-1550 and thought
if I could make a candy corn coaster to go with it, it would be cute
together. I used dishcloth cotton for both, since they were to soak up spills on hubby's tv tray.
THE COASTER: I tried different ways, first knitting, which was too pointy, so
switched to crochet. I put a pic of the mug on the coaster so you can
see the size of it better. The bottom is actually yellow, but colors
aren’t showing right :(
I made 20 st and then sc into second st from hook. Sc next row for a
firm bottom. Then I just started decreasing at the beginning and end of
each row, with crocheting 2 together. The dec at the end of the row was
coming off blocky to me, so I did the decrease on the actual last sc and
the loop of the turn stitch, and the side remained even and slanted
properly - SEE PICS 3 & 4, ravelry link below.
When you change colors, it will be on the dec st, at the END of a
row. You will pull up the 2 st loops that you are going to decrease
with, BUT, pull thru the dec loop with the next color, then your ch 1
and turn, and your next row will all be the same color. When you get to just a few left, crochet them together into a decrease to make the point, cut the yarn and pull it thru the loop. Hide ends.
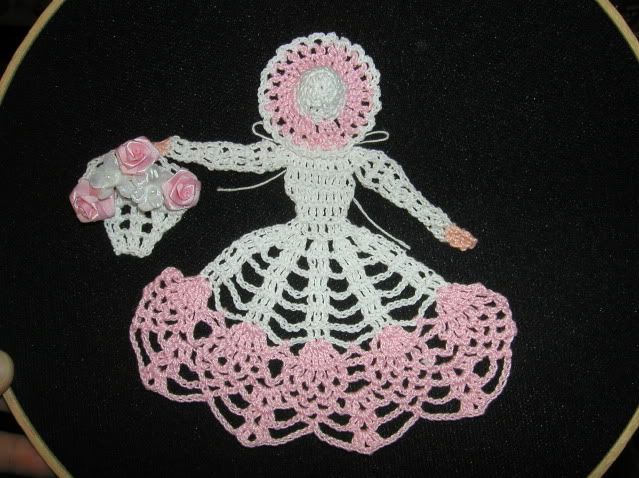
May 17, 2010 12:00 AM I started and finished my small crinoline girl April 28, 2010. She was supposed to be from size 70thread and a 14 hook to go on a handkerchief, but you know that don't sound like me! Same old #7hook and #10 thread (At Lydia Aqua & White)! I think I learned a lot making her, there were a lot of little fiddly things to do, and ends to bury and things to situate. She came out about 5x6". The pattern can easily be found on ebay in the old book Crinoline Lady in Crochet. BUT, be careful to get the original that has writting toward the top of the cover where it says either: 1949 Coat’s & Clark’s (or Spool Cotton Co) Book No 262. If there is no small print at the top of the front cover, then it could be a repro from Yesterdaze, which cost more than the vintage copies AND THEY LEAVE OUT A FEW PATTERNS. That was just maddening to find out I paid more and got less patterns than if I'd just bought an old copy on ebay! I also bought Sunbonnet Lil from them, and find they left out patterns from it too, so just try to get an original from ebay, as the repro's are incomplete.
I made 6 petals in my flowers by doing the ch 1, sl st, ch 1 until there were 6. I made 3 extra flowers for the top edges of the skirt and the hat, and I made 3 extra so I could put one of the top of each side of the skirt, and on the hat.
I left my little gal on the kitchen table when I went to bed, and when I woke up, hubby had left a little post-it note beside her :)
I loved her so much, that I finished this "Ms Love Miniature Crinoline" on May 17th, 2010. You can buy the pattern from crochet memories in either a single purchase, or in a package of the miniature crinoline girls, here:
http://www.crochetmemories.com/patterns/miss-love-miniature-crinoline.php
or in the miniature package:
http://www.crochetmemories.com/patterns/miniature-crinoline-girl-doily-pack.php
Here's my personal changes/notes: I used a 1.5mm(USA #8 hook) and At Lydia Pink & White - the pink label was missing, so don't have exact name. I usually put the wrapper inside the core, but it got away, somehow :( I usually adjust things to my own style, just a little, here's my notes:
The first thing I did was the hat, and I noticed mine was too flat. When I did the white, there was the end thread, which I covered by crocheting over it with the pink for the brim. I saw a little of the end sticking out, and pulled it, and my hat raised into a nice dome, so dont cut that string until you are sure the hat is not flat!
I did a few things in a way that were easier for me. Like I didnt put the hat on until AFTER the girl was done. It just seemed to heavy clunking around. So, I took the white hat edging starting and finishing threads and put them thru the dress and tied them in a bow, like anyone would tie their hat under their chin. Since I did not start by attaching bodice to hat, instead I: ch 6, 4dc into 4th ch from hook. Skp 1 ch. 5dc in last st. Then rnd 2.
I wanted hands, so I used peach and did 3sc, then 3ch and turned, making 2 dc that went into a cluster for the hand tip. I noticed the beautiful heart shapes on the bottom of the dress, and didnt want anything to interfere with their shape, so left off the ending ruffle. I made the basket, then worked the hand, completing the cluster around the basket. BUT, I wish I had been smart enough to do the flowers before putting it on the hand, they were a bear to get on after it was already attached. I used small wired flowers from the wedding section at Hobby Lobby and wired them on.
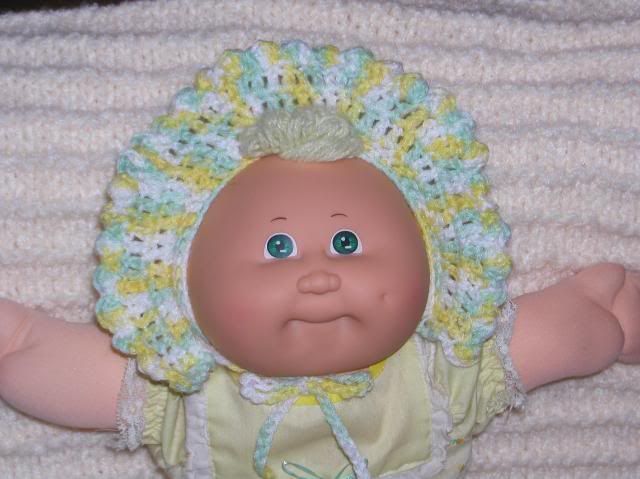
May 6, 2010 12:00 AM This is my cabbage patch bonnet for my preemie. The pattern is available on www.ravelry.com as a free download. If you are not a member, I highly recommend it for finding pattern sources and inspiration. If you are already a member, the pattern is here:
http://www.ravelry.com/patterns/library/cabbage-patch-kid-crocheted-bonnet
I used Hobby Lobby Brand "Baby Bee Sweet Delight" in color Snuggle Ombre, with a USA size #F hook.
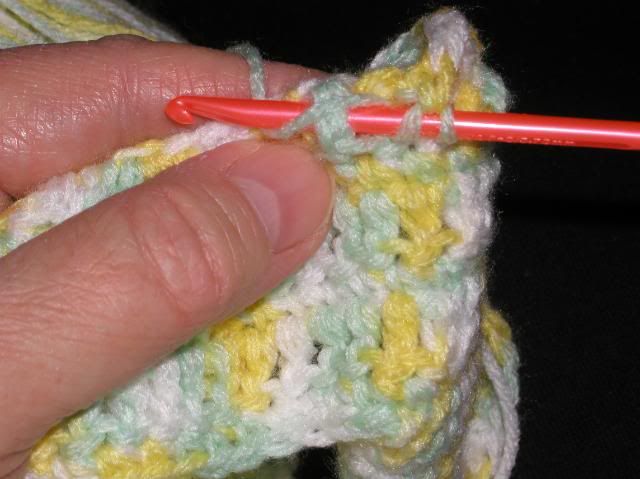
This is me doing the post stitch from the pattern, going from right side of next post, behind it, and coming up on the left side to grab the working yarn. It will go back behind the post to reach the 2 st on the hook that are waiting to complete the dc.:
I made some simple changes to the pattern/wording and the designer has incorporated those into her pattern download. The pattern goes extremely fast, highly recommend! Apr 16, 2010 12:00 AM This is a vintage pattern and a little pondering was needed to have it come out correctly. I used a #7 steel hook and At Lydia's #10 thread in white and Golden Yellow.
FORSYTHIA DOILY by the American Thread Company in Star Bk #151, Doilies and the pattern is now out of copyright and can be found by joining the yahoo group:
http://groups.yahoo.com/group/celtsvintagecrochet/
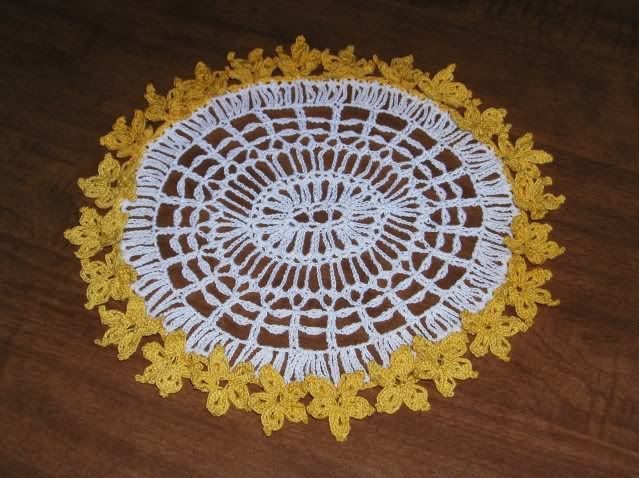
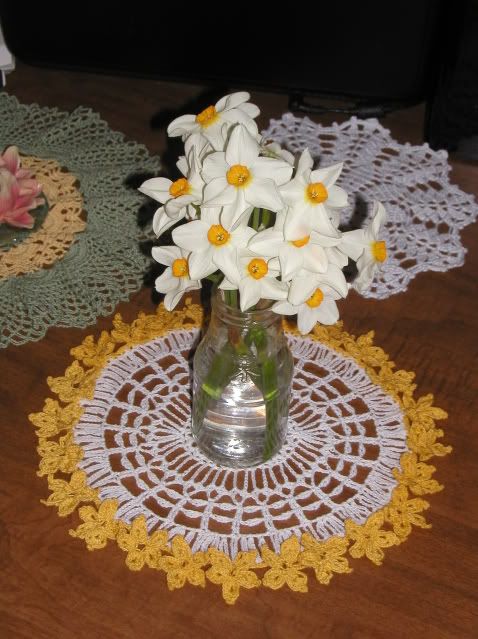
I have a boatload of notes and demo pics on this doily on ravelry, same name there "cozyhomelife", here:
http://www.ravelry.com/projects/cozyhomelife/forsythia
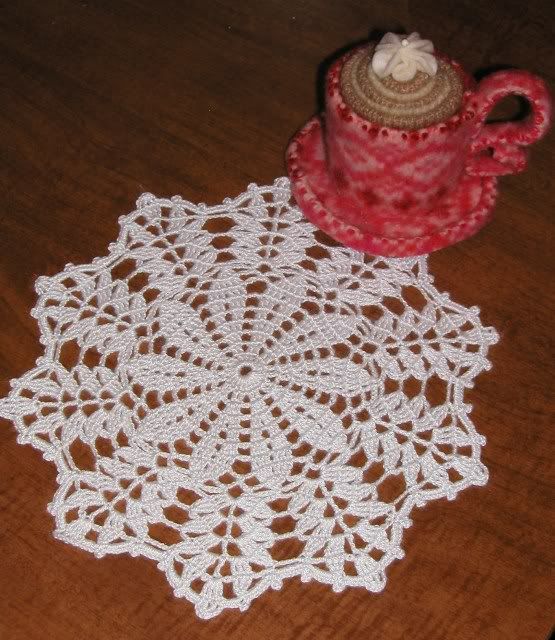
Mar 28, 2010 12:00 AM Ok, here's my Autumn Reflections, looking nothing like autumn! I took 2 pics, because I couldn't make up my mind which look I liked better.
Here's the one with the cup made from a sweater (I didn't make) that I told you about sometime earlier:
And here's one with a pic of one of my sweet madonna & child figurines I love:
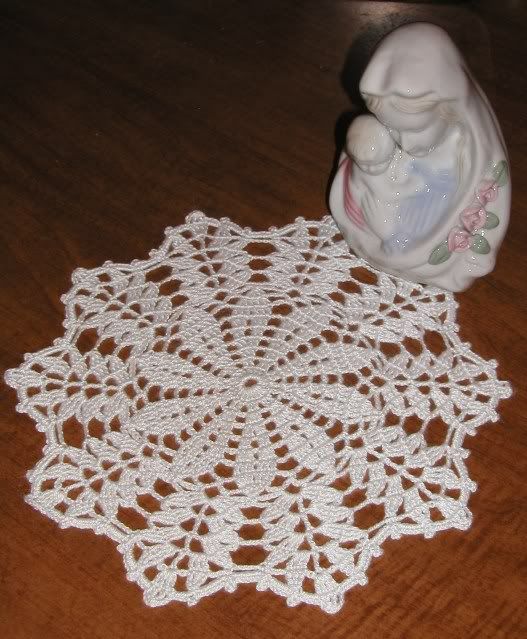
link to pattern:
http://www.crochetmemories.com/archive/november4.html
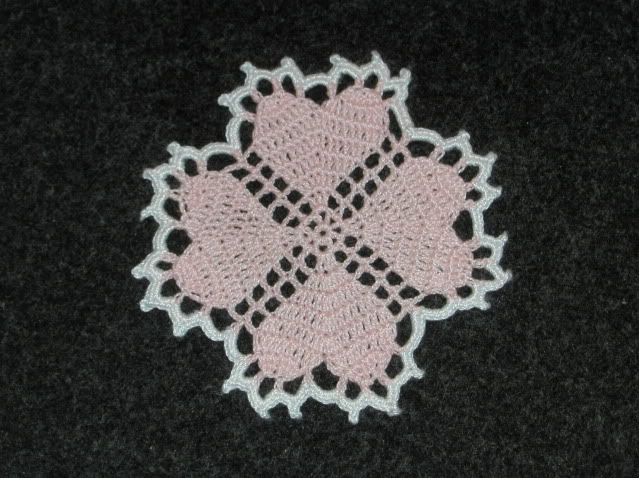
Jan 29, 2010 12:00 AM "HEART" from Ultimate BOOK of Miniature Doilies
|
|
| I saw this small, very simple looking little 4 heart doily in one of my books and decided to make it. It was whipping right along, and I was living in a world where I believed the humps of the top of the heart would be made by a series of triple crochet stitches and slip stitches for the low middle part. Unfortunately, when I reached that part, I found that you had to fasten off and restart for each hump at the top of a heart! arggg... I did it, but now the instructions for the chain stitch loops around it are just insane, like rejoin in the first stitch of the 7th round on the right side of the top of the heart's first half. Just way too many words there. I'd much preferred an arrow pointing to the picture! Look at this mess! (wails the person who hates hiding ends) |
|
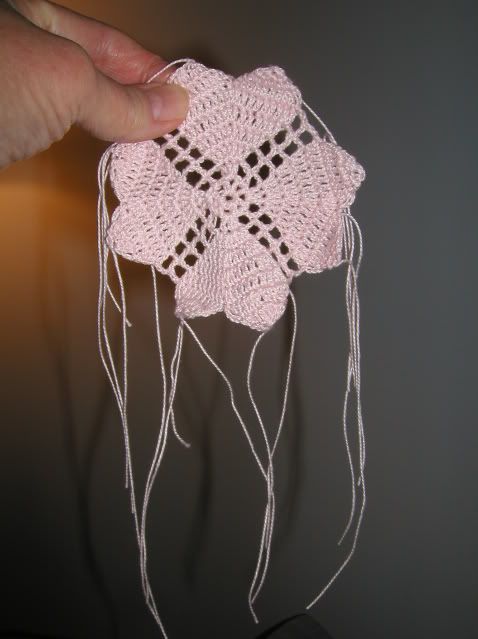
Well, it took me 1 hour and 20 minutes to hide all the ends from the heart humps that had to all be worked separately - and that's a LOT of time spent burying ends for a 4.5" doily! I used a pale pink that was a DMC Traditions thread (not cebelia) that used to be found at Walmart, and changed to a white for the final round. There are so many ends because you have to finish each heart bump top separately.
For the white finish rnds, just the last round that encircles the hearts and brings it all together, and then a round of stitches over it to give it some weight. I looked at the pic in the book and just aimlessly do it, since just reading the first line of where to put the first stitch drove me insane, and each stitch has an equally alarming description of where it goes. After all, the person who did it originally had no instructions and just decided where to put them... so......
It was very sweet when done, though.
| |